Tuesday, 18 December 2012

Bradford Animation Festival 2012: Neil Thompson


Recently, our course took a visit to the animation festival held at the Bradford media museum over four days. There was a variety of animation reels, guest speakers including industry professionals as well as indie developers, and also topical panels. Through various posts, I will be discussing some of my personal highlights which I felt were most relevant in my own area of development within the industry.

Perhaps one of the most exciting talks was given by Neil Thompson of the Triple-A game company Bioware. He spoke about games as a creative and expressive art form, originally leaving his job at a carpet shop in Manchester to become a traditional illustrator. Attendees of the talk were given insight into the birth and development of cinematic gaming, an industry that has only existed around thirty years.

Thompson spoke about the ever changing technology within the industry, originally working with 32 by 32 pixel monitors and software allowing for a limited colour pallet. He showed exclusive footage which had been developed for Lucas film mixing live action with 3D animation. After working on various titles with large game companies, Thompson began an indy venture called 'Curlymonsters'. The team produced a 'Wipeout' style racing game for the xbox console, a project Thompson took great pride in. Eventually Thompson rejoined 'Sony' (once Sygnosis) as Senior Artist. He worked on the Formula 1 franchise which boasted realistic lighting and reflections, as well as detailed and realistic damage. After also spending time working for Bizarre creations, he eventually joined  Bioware as Director of Art and Animation.

Thompson also spoke about some of the obstacles present for someone who is interested in working within the game industry.

Firstly, the technology is always changing, meaning that it is important to be able to adapt and learn new software on demand. This means that there is a re-training overhead. There is also the issue of maintaining artistic integrity, something which can be difficult when working collaboratively with larger companies who are focused on marketing a product. Also, as the game industry is still in its early stages, poor management can still be an issue present even in the more established practitioners.

Thompson explained that it is important to:

Become proficient in your core discipline.

Learn how to translate your work into the media of games.

Practice diversity and allow room to specialise.

Critique your work based upon an Industry bench mark.

And finally absorb and embrace inspiration from a wide pallet (traditional art, film, photography).


As a hopeful concept artist, I find the points raised in this talk very helpful. I must draw in visual inspiration to better inform my ideas and broaden my creative potential. Also, on top of personal accomplishment, I must constantly compare my work to that of industry professionals if I ultimately wish to aspire to that level.

Thursday, 6 December 2012

Inside 343 Industries (Halo 4)

I stumbled upon this fantastic video giving insight into the process behind the latest installment of the 'Halo' series:


I found the video very relevant, as it not only touches on game level design, but also includes lots of the cinematic processes. When you see the resources that  the professional games studio has access to, you realise that you are merely scraping the barrell. One area that seems ever present in game cinematics is motion capture. In a sense the process bridges the gap between 3D animation and real acting. This link between gaming and a cinematic experience is an approach we must be aware of within the modern gaming industry. In many cases we see place holders and basic sets created for the actors to interact with, which is evident in 'Witcher 2.' We even see cameras filming the actions in realtime and the 3D results being displayed on a monitor:


At this level, we almost feel we are viewing actors in theatre or on a film set. The virtual character movements begin to feel human, and the more traditional methods (in terms of 3D) of key framing begins to become less important, and the effectiveness of the character performances begins to lie on the shoulders of the actors themselves, as oppose to the animator. This applies to the camerawork, where a physical camera operator takes charge for a lot of the framing. We see two different industries beginning to merge, as tradition film methods shift into cinematic gaming.

In terms of our own work and process, we had a more tradition 3D approach, key framing everything including character animations and camera movements. It is interesting to look at the scope some of the professional gaming industries have in terms of facilities and specialised practitioners. Referring back to the original Halo 4 video, we see orchestras performing cinemaesque scores, and the transitions from conceptual art to game environments. It really is fascinating the number of different art forms that are brought together to create immersive gaming experiences.

Wednesday, 5 December 2012

Piecing Everything Together in Unity

As we neared the end of our project, there were additional scenes that had been animated that were not storyboarded. To help us when composing the shots in the Unity engine, I produced a revised storyboard covering the new animations that Dan and Joel had produced. I left some frames blank as Joel felt he wanted to show his Ninja character and how he would be represented by the shot choices. Another idea of this storyboard was to give Joel the tools to produce an animatic to help with the timings of our Unity project. Bellow is the appended storyboard:


As I had familiarised myself with most of the tools required in Unity, I took on the task of brining everything together and compiling the machinima. We initially worked together bringing in the animations, cameras and additional lighting for each scene. Some scenes were more awkward than others. Personally I think if we were to repeat the task, it would have been more efficient to model the characters in the same space (where interacting) freeze the transformations in maya and simply drop them into the scenes. Instead we had to tweak two separately imported characters to interact at the right time. This was awkward primarily in the scene where then Ninja assassinates a generic guard in the scanner corridor. We had initially wanted the Ninja to run around the corner, but found that because of a freeze transformation glitch with the Ninja's root controller, we couldn't make this happen as the animation could not be rotated on to the correct path. Luckily, we managed to bring in a straight run animation and pull him out of the shot, gradually tweaking the Ninja's position until he entered the frame at the right moment. Similarly, we had to keep adjusting the positions of both characters in the scene where the Ninja makes a charge past the guard for the exit, until the guard was knocked down at the right time. Although we managed to solve this issue, it would be interesting to try and take a more efficient approach in the future.

One of my biggest roles in the final stage of the project was applying the scene change scripts to make the project move between shots, and to bring in the sound. One error I made in this process was when dragging the scenes into the build settings window, I didn't put the first scene as scene '0'. This meant that when I eventually built the scene, it began halfway through. Not only did I have to rearrange the order of the scenes menu, but I had to go back through all of the scripts and change them to the correct scene change. One useful tool was adding in the animation event on the animation timelines to change the scenes. This meant I was able control when the scene switches happened, something I was eager about prior to the scripting process.

One problem I did face was trying to delay the sounds as oppose to them playing on awake. I did a google search to try and find a useful script, but none of them seemed to work. As a quick solution, I opened the required sound file in Audacity. I then grabbed a tiny bit of noise before the clip began and slowed it down with the 'change speed' function in the effects menu. From this stage it was trial and error, moving between audacity and unity re-exporting the sound clip until the delay was timed right with the animation. The audacity projects looked something like this:


I used the animatic produced by Joel as reference when bringing the sounds into the unity scenes.

On one final note, there was mention of putting shadows into the scene, which unfortunately due the submission deadline pending, didn't happen. This is perhaps something which could be appended before our end of year show. I also planned on adding 3D sounds into my environment, which again there wasn't time for when all our focus was on getting the scenes put together in Unity. Reflecting on this, it would have been nice to have been more organised on the deadline date to go over everything and fine tune our own contributions for submission. Finishing on a positive note, we did manage to get our machinima running realtime in Unity complete with sound, an outcome I was a little apprehensive about when it came to the morning of the hand in date.

Compiling the Space Scenes

It was recently realised that we needed the Ninja's small ship as an asset to animate and take into Unity. The ship needed to be something very simplistic and lightweight, so I began by sketching up some silhouettes:


As you can see, I went for agile sharp and slick designs, trying to in some way represent martial art weaponry, most prominently perhaps the throwing star references. In the end I settled for the small design on the far right above the tall thin idea. I felt the design had something very bold and distinctive about it, so I decided I would recreate it but rotated 90 degrees to make it appear more like a streamline getaway ship. Though unorthodox I will admit, I jumped into maya and modelled the asset without setting up reference images. Perhaps on reflection I shouldn't have cut that corner, as although I was happy with the end results, it does not showcase the whole process very well.
I had unfolded the UV's, but had trouble figuring out some of the faces and couldn't stop severe stretching in certain places. To eliminate this, I projected each side of the ship individually by highlighting faces the the paint select tool, instead of using the unfold tool in the UV texture editor. After applying a red striped texture resembling those found on Joel's ninja character, I had my asset ready to be taken into Unity:


Again, the resolution of this smaller asset's texture was an efficient 512 by 512 pixels.

I also took on the small task of animating the establishing shot and the final explosion scene. The first shot I animated was the ship exploding whilst the ninja ship escapes over the camera. Working with a locked camera in one of the view panels with a resolution gate, I attached the Ninja ship to a CV curve. After eliminating the easing out in the graph editor, The Ninja's escape was complete. With some simple rotations keyed to the Whale Ship's main controller and the ninja ship along its path, I had all I needed to take the scene into Unity. Unfortunately when I reopened the scene to capture a play blast, the locked camera panel had been reset, but here's a play blast of the animation itself:


When I imported the FBX file into Unity and placed it in a scene, it was suggested I add lights to the Whale Ship asset. The first thing I did was create a self illumimap for the cockpit screen. By also placing a green point light on top of the cockpit, The ship suddenly seemed to have more life. I also was also shown how to create a simple particle effect to act as navigation lights. The principle of the effect was having one particle that was not emitted but simply appeared and died then looped. To bring out the ninja ship, I had the rep stripes left illuminate. On top of this, I gave the whale ship a crisp specular bump map to make it pop from the scene.


I was originally working with a preset night time skybox, but clouds were visible in the scene. This meant I had to create my own backdrop for the scene. I originally unfolded a sphere with reversed normals in Maya, and took the 4096 by 4096 UV snapshot over into photoshop. To create the starts I made a very quick custom brush. I applied a few black spots on a white backdrop then defined a new brush preset after marquee selecting the area. I then quickly added a 1000% scatter effect to randomise the spread of the stars. Using the new brush I created a starry space backdrop, applying a few transparent blurred shapes in the backdrop to emulate different gases in the distance.


The sphere caused the texture to stretch, so we decided that we would take the material and apply it to a plane instead. I also tried a self illumimap to light up the starts, but it made the more faded purple ones in the backdrop look blotchy. Finally, I applied a green main light, in keeping with the theme and working well with the purple backdrop, with a complimentary red edge light to give a cinematic quality. If I could pick a flaw with this particular scene I would say the subjects pop out from the backdrop perhaps a little bit too much, making it look as if the models are performing in front of a flat image. Perhaps given more time, I could work with colour correction image effects to bring everything together.

I also had to find a way to create an explosion. I originally created a large spherical particle emitter firing out transparent flame targas I had created in photoshop:


After being advised it was two simplistic, I change the size of the effect and duplicated it to various different positions around the Whale Ship mesh, both the emitters, navigation light particles and the cockpit pointlight were parented to the main body mesh. I also tweaked the start delay for each explosion emitter to vary the flame effects.


Bellow is a snapshot of the fully lit scene:


I duplicated this scene and imported a simple animation of the Ninja's ship flying toward the Whale ship to create the establishing scene. This meant that all the lighting stayed the same, I simply tweaked the camera view.

Building an Evironment (Part 2)

After completing the modelling process, It was time to bring my detailed assets into Unity. We had the idea of scaling up our level before exporting it out of maya, believing it would make getting into the scene and placing cameras easier. The first hitch I hit was when bringing in the first person controller into the enormous environment. After Scaling up the player, Movement was very slow. After speeding up the movement, severe sliding occurred, meaning when navigating around the environment you almost felt as if walking on ice. To tackle, I scaled up the level by 10 instead of the usual 100. I figured I would scale it back up for the actual scenes.

After bringing in the level, I applied a simple specular bump from desaturated UV texture images. This immediately brought out the floor in particular. As there is a strong theme of stealth in our storyboard, I wanted a very dark environment so I kept the lighting subdued, with the generator room as an exception (I thought it would be good to have strong dramatic lighting where the climactic confrontation takes place). After being introduced to some interesting tools in Unity, I began playing around with animated lights and self illuminating objects. I began with the computer room. By bringing in a black and white targa image (The white area highlighting the screen which I intended to light up) and creating an alpha from the grayscale image, you can see from the snapshot below that the monitor has its own light source:


Notice that the player is restricted from walking right up to and entering the camera room. This is because as you may have already noticed, part way through the modelling process I began working more efficiently and allowed back face culling to be visible in maya on the door, camera room, and generator room asset. When I at first allowed the play to venture to the end of the corridor, to the left, back face culling of the doors and generator room could be seen. When I put this environment together, I almost imagined it as  being a behind the scenes movie set walk-around. Perhaps if I had have sacrificed a little bit of efficiency when modelling the camera room, and linked it more solidly to the corridor assets, I could have kept my environment immersive and realistic throughout. I am not sure if the fact you can see this room but not quiet get to it could annoy players exploring my playable scene. I also keyed the blue point light in the computer room to flicker adding a further sense of realism.

Still seeing my space as a set rather than a seamless game level, I only had lighting in key areas referenced in our storyboard. The long corridor to the left of the first person controller was intended simply to allow the player to walk up and see the camera room on display, almost like a exhibition piece seen behind a screen at a museum or gallery. However, there was talk of adding in extra sequences by the others which would open up my environment, meaning that I had to find ways to add more interesting lighting. After receiving feedback from a critique, I had comments of the level being quite dark in places. I played around with the fog in the render settings to bring out some of the geometry and help add more of a visual aid for the player to navigate the scene. I also wanted to bring some red into the scene to compliment the green lighting and add further evil connotations. For this to make sense I need some object to act as the light source. I had the idea of positioning small terminals down the the long bare corridor, so I made a simple model in maya, self illuminating the red strip I had modelled into the geometry.


I originally added a red point light, but soon realised the object I had modelled didn't make for a sensible computer monitor with the narrow strip. I thought however, I could revive this by turning into some form of security scanner. At this stage I had been introduced to light cookies, so I thought I would apply a grid projection adding the illusion that the red light is scanning the environment for intruders. Bellow is the targa image I created to act as the cookie:

As I didn't want the new spotlight to project a repeated texture, I set the wrap mode to 'clamp' after doing this I had some strange results with bars of red project above and below the cookie. I made a few attempts at correcting this, but in the end decided the bars didn't look too out of place as part of the laser scanner effect. I had two scanners positioned down the corridor so animated the two projections panning up and down the space, I felt this added life to the so far very static environment.


There a few laws I was given when considering realistic lighting. Number one, there is no such thing as pure white light, at most any light will have at least a teal tint. I also learned that cookies can be applied to eliminate the perfection we get from computer generated lights. In reality any light is distorted by the air and the atmosphere, with blemishes and imperfections in its projection. I applied a simple cookie I created to the directional lights and spotlights in the scene to create the illusion of blemishes in the projections:


Again I used the clamp wrap mode and created and created an alpha from the greyscale. I also created a  'self illumimap' for the green lights on the doors.

I really did enjoy experimenting with the lighting in Unity. I feel the ability to work with cookies presents many creative opportunities to have fun with how things are lit and to create interesting projections. I also am pleased to have unlocked the animation window, where assets can be manipulated to create events within the game engine. 

Prior to this stage, our group had also spent time collecting sound effects from the sound booth within college. We had gathered miscellaneous Sci-fi sounds from 'Logic Pro' and also recorded spoken dialogue. When it came to adding the 3D sounds into my playable environment, I realised that some of the files were as large as 20mb. It wasn't until later when it came to applying them into our actual scenes that I realised Unity automatically compresses them into manageable files.

Unfortunately, there were issues with the lights baking when I built the level for the web. As I am not able to pre bake the lights, all the cookies and bump maps were lost. This means I cannot display the web version bellow as I would have liked to.

Building An Environment (Part 1)

To begin development on the interior space of the Villainous "Whale Ship", I produced some quick corridor concept art. Although I usually like to spend a little bit more time developing my ideas, I knew that the sooner I could compile a game space the sooner the other two team members could begin animating their rigged characters in the virtual environment. I first visited some initial concept than teammate Dan had produced of a corridor within the ship. Obviously as I was mainly in charge of the ship's development, I wanted to expand on the concept, whilst at the same time drawing from the elements I liked about the idea:

(Work produced by Dan Schofield)

With this image, I liked the dark 'dirty space' kind of feel, steering clear of pristine white corridors we see in some Sci-fi works. This adds connotations of an antagonist's domain. I also liked the panelled walls, adding a sense of detail and complexity to the environment that would be fairly easy to achieve in Maya.

So I took elements of Dan's idea, and tried to apply it to my own development. I thought of the ships whale-like exterior, and considered how I could translate this into the ship's interior. I thought of whale arches, Particularly the one displayed in the seaside town of Whitby:

I thought this idea of an arch could add an interesting structural foundation for a corridor system. Before  I began drawing out my ideas, I first put together a mood board. I was looking for very tidy corridors consisting of solid angles and lots of panels, very much like Dan's initial concept, as well as very crazy organic style ones to compare and contrast:


From these images, I tried to draw inspiration, originally setting to strike a middle ground between organic and mathematical (as I see the fractal-like repeating corridors):

I considered how I could apply this jaw structure, and found an interest approach was to represent the scaffolding as a spine, with a column running through the centre of the ceiling. I felt the most effective, and realistic apporach when considering my modelling abilities in Maya, was the second idea. In the end I went with the very repetitive mathematical approach, but I find it interesting how this was informed by very organic and in some cases wild subject matter. As I was already aware that the colours were mainly going to be dirty low saturated and almost grey, I produced some fast lighting concepts using colour overlay layers in photoshop:
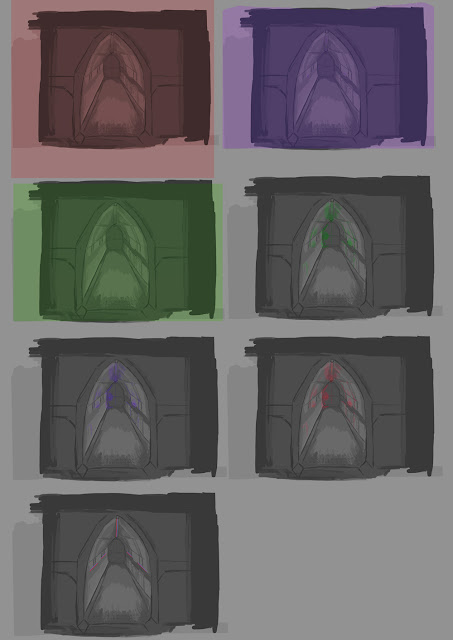

As you can see, I applied some very flooded lights, and some more subtle overlays . I used lots of green both to reflect the exterior of the ship and to also continue this uneasy dingy effect I was trying to achieve with the antagonist's environment. In the end I went with this dingy green approach. In reflection, although I considered the background and archetype of the character who possessed the space, I didn't actually consider including the colours chosen by Dan when choosing them in the environment. Although as it happens the greens work quiet well over the brown and teal chosen by Dan, perhaps it is worth considering the development of my teammate's work alongside my own work when producing collaborative projects. It is quiet easy to veer off on a tangent and find you are all moving in different directions. I will keep this in mind in future and try and maintain better communication with my teammates in relation to ideas and development.

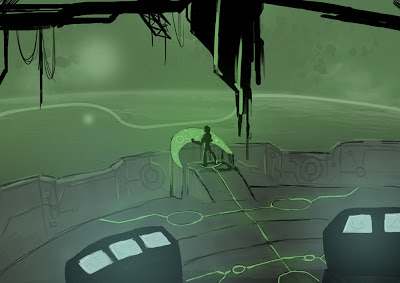
This final piece of concept art was produced simply to give a better idea of the scale of my 'Whale ship'. With the size of the cockpit, one could easily assume that this is a small lightweight craft, whereas I am aiming for a large vessel hosting a maze of corridors. To clear up any potential confusion, I painted the inside of the cockpit. Again, as time was of the essence, I grabbed a space landscape from a web search and dropped it into my image. I am aware of potential copy write issues, which hopefully will not apply as the painting is not for commercial use. I also plan on replacing the backdrop with my own work before uploading it to any media sharing platforms or adding it to my personal portfolio:

Instead of producing technical drawings, I jumped straight in to Unity and blocked out a set. I included the main corridor where the ninja runs past the security camera in the storyboard, the room where the bomb is planted by the ninja and the surveillance room where the guard first catches a glimpse of the ninja.
I colour coded each section to make the plan visually easy to make sense of:


The blue area is where the ninja darts past the corridor. The red is the small camera room where the guard monitors the screens and the green area is the bomb-plant room where most of the character interaction takes place. I took this plan and began creating a very blocky model in maya. I planned to first create the walls and eventually join them with the arches. It was pointed out to me however, that this was a rather inefficient way of working. The walls were looking bare and texturing the whole object would be a very difficult and tedious undertaking. Instead it was suggested that I model required segments to be UV mapped and then eventually slotted together. Bellow is the abandoned first attempt at creating my environment:
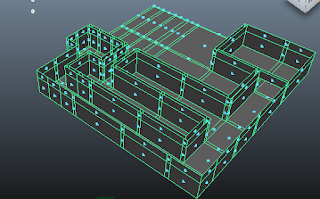

This new approach of working with pre-modelled and textured segments is similar to how Bethesda created certain elements of the 'Skyrim' world, as demonstrated by their 'Creation Kit' which offers the tools the developers used, to moders who wish to create their own environments:


It is interesting to see the actual interface Bethesda developers used to create the a Triple-A title. Where I feel it is relevant to me, is when considering tidy organised practice. We see assets grouped with sensible naming conventions, which I imagine would be crucial for a smooth workflow especially on such a large and ambitious game title. Looking at in essence the workspace of a Bethesda game level designer, I feel that although I did organise certain assets into folders, I could have been even more organised with my Unity workspace. If we consider that there were most likely several level designers working on the same project for 'Skyrim', their interface probably had to translate easily between practitioners meaning it could be passed around and tweaked to spread out the workload. Even at our stage, it is important to be thinking about how our Maya project would translate if passed over to an  animator. Would they be able to understand the hierarchy and naming conventions, would they be able to break the rig where unlocked attributes are present?

To begin my new direction, I started modelling the straight block, then I took a small segment of this initial model and extruded it into a corner piece. The 'T-block' junction part  was a bit more complicated. I began similarly with a small segment as well as a straight corridor piece to lay out the points of the 'T' shape. The process involved a lot of combining geometry, deleting faces, the append to polygon tool and merging edges and vertices. I always like to get into the habit of creating tidy geometry with no faces exceeding 4 vertices.  I managed a pretty tidy edge flow with the straight block and corner block, but the T shape got a little bit untidy. Although I didn't exceed my four vertices target, I did have to tie of some of the faces in unorthodox places, ruining the edge flow on some of the edge loops. You can see this from the screenshot below:
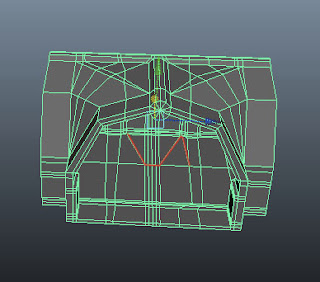

As the environment is a rigid asset, how the geometry deformed was never really an issue. Perhaps this is an area I have not visited too much over the module so far, as none of my assets have really required a tidy edge flow. It is however, something I am aware of when rigging and deforming geometry.
After creating door assets and the small security room. At this stage I was pieceing the corridor parts together and takeing them into unity with a first person controller. I now had to think of how the 'bomb plant' area would look. Joel suggested I base it on a piece of his concept work which depicted the ninja character sneaking up toward some kind of generator. 

(Work produced by Joel McCuckser)

I liked this idea, so using the T-block piece, I extended a corridor with a small generator room at the end of it. With the environment, I really wanted to take my UV mapping up a level, and eliminate as much stretching as possible. To do this I grabbed a colour coded grid image from our tutor's blog, and applied it to a new lambert texture. After unwrapping the images, I applied the texture, and began tweaking in the UV texture editor window. The idea of efficient UV-mapping is to achieve squares of equal size projected onto your geometry. 


As you can see from this original snapshot, the texture is very unevenly stretched over the geometry. To correct this, I had to move the UV points around un the UV window until the texture looked even and tidy. You can clearly see the difference after the process is complete:


After correcting all of the UV maps, I took a snapshot over into Photoshop and applied texture brushes to add a sense of realism to our environment. I set the resolution of the image to 4096 by 4096 pixels to maintain detail in the textures. This is something I began considering when thinking of efficiency when running in a game engine. Smaller assets may only require a 512 by 512 resolution, whereas larger more detailed assets require a higher resolution:


As you can see, In maya the textures appear to stretch nicely over the geometry of the generator asset:
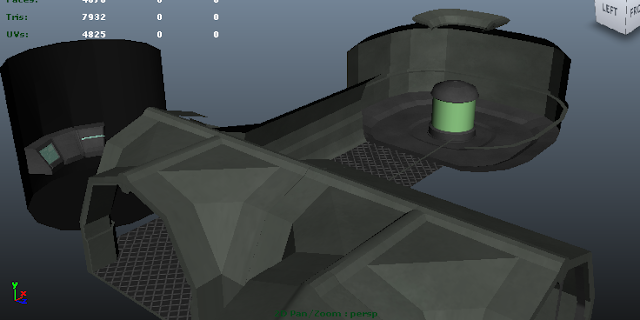


In reflection of the modelling and UV texture phase, I felt I picked up on some useful new skills. To this point I had not considered efficient UV texture mapping, and the results certainly exceed previous textures. The only slight flaw with modelling in segments is that achieving seamless walls and floors as much more difficult. As you can see, the metal mesh floors have seams where blocks are connected. Working in separate Photoshop documents, this would be hard to amend, especially when trying to get the tiles the same size when placed over the geometry. Perhaps if time permitted, I would spend more time trying to make my corridor assets seamless for a more realistic flowing environment.